U.S. flag An official website of the United States government.

dot gov icon Official websites use .gov

A .gov website belongs to an official government organization in the United States.

https icon Secure websites use HTTPS

A small lock or https:// means you’ve safely connected to a .gov website. Share sensitive information only on official, secure websites.

NOAA's Emergency Response Imagery

How to use the National Geodetic Survey's online viewer to explore aerial images following major natural disasters.

View a quick overview of how to use the NOAA Emergency Response Imagery online viewer. A more detailed video overview is also available.

As soon as weather permits following major natural disasters, the National Geodetic Survey begins aerial survey missions to assess damages to affected areas. Typical weather-related events include hurricanes, tornadoes, and floods. NGS responds to other events, such as oil spills, as well. Directly georeferenced-imagery data are collected, rapidly processed, and made available via open-source Geographic Information Systems (GIS). These data and images provide emergency and coastal managers with information needed to develop recovery strategies, facilitate search and rescue efforts, identify hazards to navigation and HAZMAT spills, locate errant vessels, and provide documentation necessary for damage assessment through the comparison of before-and-after imagery. Images are also available to view and download by the general public as a tool to assess impacts to their homes and community:

  • Emergency Response Imagery Online Viewer
    The Emergency Response Imagery website provides easy access to aerial imagery collected by NOAA aircraft following natural or human-made disasters. This web application allows emergency responders and the public to quickly access images of disaster-impacted areas using standard web browsers, iOS, or Android mobile devices.

Tips for using the NGS Emergency Response Imagery Viewer:

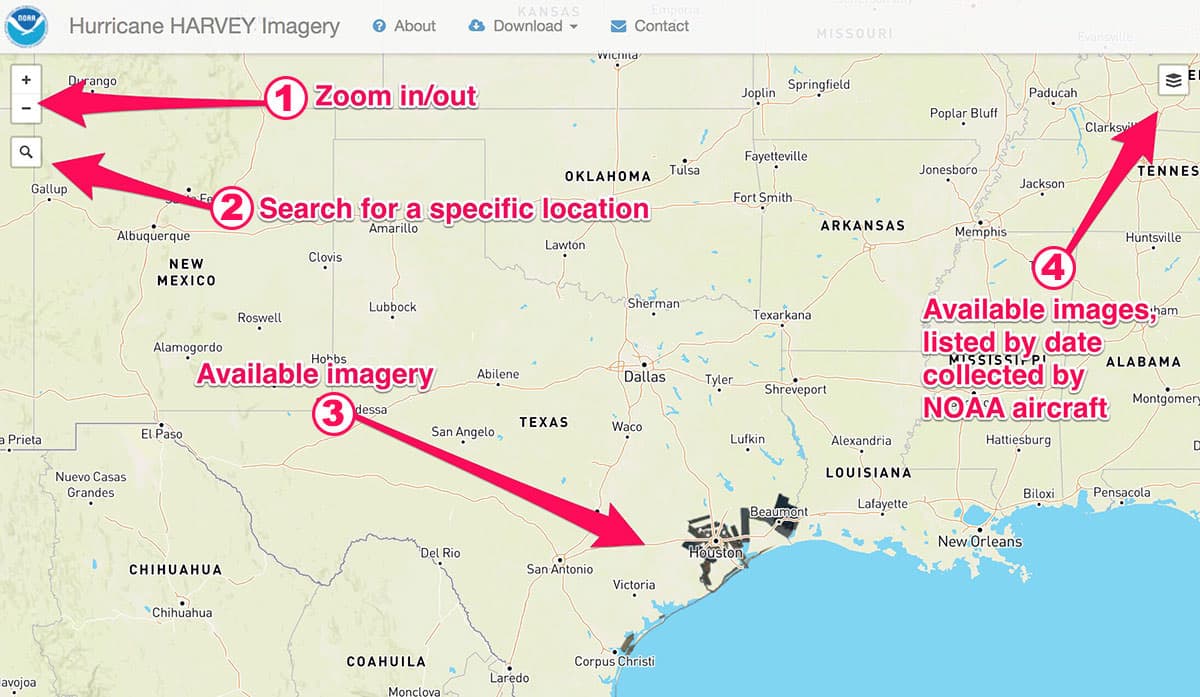
map of Hurricane Harvey imagery with instructions about how to read

This is a sample of the NGS aerial imagery viewer to illustrate how you can use this mapping tool to locate imagery.

  • 1. Zoom in/out. Plus and minus buttons are located in the top left corner of the image viewer. Tap or click on the appropriate symbol to control the zoom level of the map. The dynamic map zooms in or out from the center point. You can change the location of the map by dragging on the map with your finger or using your fingers on a mobile device.
  • 2. Search for a specific location. Underneath the zoom controls in the upper left corner, you will find a magnifying glass. Use this tool to search for a specific location.
  • 3. Available Imagery. Available NOAA imagery may be difficult to see when you first look at a map. Here, you can see the available aerial imagery near Houston, Texas. If you don't see any images on the map, try zooming in closer to the area you are interested in inspecting or search for a specific location.
  • 4. Available images, listed by date collected by NOAA aircraft. On the top right corner of the map viewer, you will see an icon with three stacked rectangles, which indicates available map layers. Select this button to toggle the view of the base layer of the map between street view and satellite view. This button also reveals a list of all available imagery, listed by the date the images were collected by NOAA aircraft.
  • For Advanced Users: Note that users may construct a custom URL for the imagery viewer by entering a known latitude and longitude in decimal degrees, along with a selected zoom level. For example, the following link will show Wilmington International Airport (ILM) in North Carolina. This URL will be "zoomed in" to level 16, which equates to about 2.4 meter resolution, at the coordinates for the airport, 34.2674 degrees latitude and -77.9020 degrees longitude: https://storms.ngs.noaa.gov/storms/michael/index.html#16/34.2674/-77.9020

Frequently Asked Questions

We make every effort to acquire imagery in a timely manner but it could be up to several days before we image the entire impacted area. Our imagery is not taken by satellites but by airplanes using a digital camera. We fly in a pattern that allows us to collect as much imagery as possible. However, sometimes, we run into challenges outside of our control that hinder us from collecting images in a planned area. These challenges include adverse weather conditions (clouds), reduced air traffic control and refueling capabilities, and other aircraft (search and rescue) that take priority.

The website is updated every day. The images are processed as soon as the plane lands and are then uploaded to the website shortly thereafter. The number of images, internet connection speed, and number of flights all play a role in how quickly the images are uploaded to the website. It is usually updated in the late evening/early next morning hours.

NOAA’s National Geodetic Survey (NGS) is assigned flight areas by the Federal Emergency Management Agency (FEMA) in collaboration with affected state and local governments.

Our imagery covers a much smaller area than a satellite image since we use a digital camera aboard an airplane. We define the areas that are collected based on input from other federal, local, and state government requests, as well first responders.

We do not re-image areas. Each day imagery covers a different area that was impacted by the event.

Imagery is not updated once it has been acquired.

You can use the layers icon  in the upper right corner of the website to identify the image dates. A drop down menu will appear when you click on it. You can then toggle the imagery off/on to determine the date for your area of interest. We are unable to provide the image time because the image tiles are made up of several images. These multiple images are processed to create a single georeferenced image.

Please click on the magnifying glass  in the upper left corner of the website (below the + and - buttons). A box will pop out to enter an address. The map will then zoom to your area of interest.

You can use the layers icon  in the upper right corner of the website to identify the image dates. A drop down menu will appear when you click on it. You can then toggle the imagery off/on to determine the date for your area of interest.

You can think of a tar file as a folder that contains the images. You will need to extract the images from the tar with a program such as 7-zip or Winzip.

We do not have the resources to create custom tar files. The emergency response team is either flying airplanes, operating sensors, or processing new imagery. You can try the WMTS site, located in the “about” section, if you are having trouble downloading the bulk image tar files.

Detailed Video Overview

A detailed video overview of how to use the NOAA Emergency Response Imagery online viewer.